Sunday, May 20, 2018

Whimsical Birdhouse


I made this cute little birdhouse using the Rustic Spring Garden Kit from the International Scrapbook Garden.  The flowers came from the Bonus Paper Kit of the Rustic Spring Garden. I used the Shimmerz paints to paint the roof coral and stripe the walls.  You'll find the paints in the Mixed Media Rustic Spring Garden Add-on.

My birdhouse cost $1.00 at a local craft store.  I used Aleene's Tacky Glue to adhere everything.
For the roof I cut 2 inch strips from the white paint paper and painted them with coral reef Shimmerz. I adhered them beginning at the bottom of each side of the roof with adhesive on the top only.  This allowed me to curve the pieces of paper slightly to give a shabby look.  I then cut the side pieces and painted them with the steely blue eyes Shimmerz.  I intentionally did light stripes to give it a little dimension in the woven paper.  I also painted around the bird hole!  I cut 1/4 and 3/8 strips from pink wooden patterned paper to do the eaves and the footing for the house.  Finally I added a 1 inch burlap square, the Prima Flowers and the Blessed sticker mounted on patterned paper and fussy cut.  The final touch was the tiny butterfly on the eaves of the house.  Keep thinking outside of the layout and you can create wonderful off the page gifts!


See the blue stripes on the paper?  They really add shimmer in the sunlight.  And the Prima flowers are so cute and country looking.  I just love them with the tiny house.

Have a wonderful week!  I hope you are having good weather wherever you are.

~ Victoria

Saturday, May 12, 2018

Happy Mother's Day!

It's another beautiful Spring Day and a day to honor Mothers here in the US.  I would like to wish each of you the happiest of Mother's Days!  I have been working on this door hanger this week, using the Garden Kit:  A Rustic Spring and I also used lovely flowers from the add-on from the Extra Blooms Kit.  I also used the Shimmerz Spritz in Plum Pudding on the title.  Extras I used were Shimmerz Texturez in Tidy Widy from an earlier kit, acrylic paints in green and yellow from my stash.  Also there is a splash of spots in Penny for Your Thoughts Inklingz.  I also add three rusty butterflies!


And a close up of the texture and beautiful flowers!  I also really like the variegated effect on the Bloom where you are Planted chipboard piece!


Thanks for stopping by and be sure to check out all of the awesome products at the International Scrapbook Garden!

Have a Blessed Mother's Day!

~ Victoria

Thursday, April 26, 2018

Another Card from the Recipe Book!

Do you remember our recipe from the 18th of April?

The recipe:
Colors:  Pink, Purple, Black and Whites
Patterned paper from the Garden Kit: Rustic Spring Kit  cut to 5 1/4 x 4
Embossing
Chalk Ink (Prima Ingvild Bolme Chalk Ink Blossom Tree)
Butterflies
Flowers (Market Floral Mixology )
Title
Glitter

Spray Mists (Shimmerz Spritz in Plum Pudding)

I made another card using the same recipe.  Here is our second card:


To refresh your memory here is the first card (see the details on the April 18th blog):


Sorry about the color variations!  Time of day and location!  As you can see both cards use the color theme of pinks, purples, black and white.  Each features embossing highlighted with chalk ink.  Butterflies on both - check, Flowers on both - check, a title - check, and Mist - check.  When I have challenges with my creativity, it is easy to write a recipe with elements you have on hand.  You can then go back to your recipe and see what different creative ideas come to mind with the "same old" recipe!

These cards feature papers from the Garden Kit: A Rustic Spring, the chalk ink and flowers also are from this part of the kit.  I always love the bonus embellishment add on; the butterfly, title, white pearls, glitter and white leafy branches are from this add on.  And you don't want to miss the mixed media add on.  You can see the amazing Shimmerz Spritz on this close up:


Isn't it amazing what one little recipe can do?  You really should check out the Rustic Spring kit.  From all of our design team work, you can tell it won't disappoint!

See you soon with more ideas!

~ Victoria

Thursday, April 19, 2018

Art Journaling with the International Scrapbook Garden


Do you love art journaling as much as I do?  I love to try out new techniques and ideas in a "safe" space to see if they will work!  For this project I used the Fairy Garden Kit: A Rustic Spring and the Bonus Mixed Media Kit.  I am in love with how this page came out!

Products Used:

* Golden Gesso (white)
* Purple Gel Pen
* VersafineBlack Onyx Ink
2- strips of patterned paper from the main kit cut 1 1/4 x 6 3/4 inches
2- strips of patterned paper from the main kit cut 3 3/4 x 3/4 inches
Prima Chalk Ink in Blossom Tree
The Crafters Workshop Stencil by Carmen Medlin
49th and Market Laser Shapes Happy Moments
Clear Stamps Romantique
Inklingz- Coral Reef and Steely blue Eyes
Spritz - Plum Pudding
KaiserMist - blackberry

* From my personal stash.
The stamped circles that are smaller were made with prescription bottle lids!  Use whatever you have.
Thanks for looking at my page and I hope you will post some of your inspirations in our Facebook group.  And really check out these kits.  They are amazing!


~ Victoria

Wednesday, April 18, 2018

Happy - A Card Recipe to Try!


Hello from the rainy Pacific Northwest!  I am still dreaming of sunshine, despite all of the rainy skies here!  This week I am using the same papers and same techniques to produce two very different cards.  I will show you the first one today and the next one later in the month!

The recipe:
Colors:  Pink, Purple, Black and Whites
Patterned paper from the Garden Kit: Rustic Spring Kit  cut to 5 1/4 x 4
Embossing
Chalk Ink (Prima Ingvild Bolme Chalk Ink Blossom Tree)
Butterflies
Flowers (Market Floral Mixology Pink Flamingo)
Title
Shimmer paint  (Shimmerz Inklingz Coral Reef and Steely Blue Eyes)
Glitter

Spray Mists (Shimmerz Spritz in Plum Pudding)

For this card I used paper from the main kit from International Scrapbook Garden; the mixed media bonus kit provided the mist, and the bonus embellishment kit provided the glitter, stamp and title chipboard.

Do you ever get stuck on your card making? Or any kind of craft for that matter?  Sometimes I find a recipe can do the trick, sometimes a sketch is just the ticket, or sometimes working in my art journal on techniques can really help!

Have a great day!

~ Victoria

Sunday, April 15, 2018

Time Passes Card


Hi, Victoria back again with another card from the Fairy Garden Kit: A Rustic Spring Bonus Paper for card making.  I did grab on element to alter from the last kit and added a key from my personal stash otherwise you can make this exactly with items from the jam packed kit!  The burlap is cut from a generous piece in the main kit, and you'll find the twine and flowers in the main kit.  I modified the flower a little by painting it with the Coral Reef Inklingz from the Mixed Media Kit for the month.  I also altered a circle behind the clock face and flower, just peeking out with the Sunny Yellow Mica Powder from Prima.  What an amazing product when used with crazing collage paste.

The Ingredients for the card:
White card stock card
Patterned Paper: 4 x 5 1/4 inches
Patterned paper three 3/8 inch strips cut to graduating length
Patterned paper:  Circle painted with distress collage medium and sprinkled with Prima Mica Powder
Burlap: 3 x 3 inch square fray the edges with your fingers as desired
Prima: Resin Clock face painted with Coral Reef Inklingz and distress collage medium in crazing
Kaiser craft Paper Bloom:  Painted lightly with Coral Reef Inklingz
Twine
Key

Layer as shown.  I used Mod Podge as my primary adhesive to adhere all of the parts to the card.
The embellishment is burlap, decorated circle, clock, key, flower and twine.

Have a fun time creating!

See you again soon!

~ Victoria

Thursday, April 12, 2018

Making Memories with International Scrapbook Garden


Here's hoping that it is Spring where you are, or Fall for  our friends in the Southern Hemisphere.  I really enjoyed working with the Fairy Garden a Rustic Spring Kit.  So many goodies in the main kit and the card papers in the bonus are amazing.

For this card I cut a 4 x 5 1/4 piece of paper from one of the 6 x 6 papers, leaving the floral border for another project.  I used the pink woven basket look paper for the umbrella, which I made using a the Inspire Umbrella Trio from Spellbinders (from my tools).  The embellishment is also from the die grouping, I inked it with Prima Chalk Ink in Blossom Tree (what an amazing pink). The sentiment on the card is from Fab Scraps Stickers (ST106002).  After attaching the umbrella and the sticker, I went to work with the amazing embellishments:  a wooden butterfly inked with the chalk in, the Prima Shabby Chic Treasures rabbit, and the 49th and Market flowers.

Isn't this a fun card?  Happy spring!  Be sure to check out the kit and consider making it your own.

See you again soon for more inspiration!

~ Victoria


Thursday, March 22, 2018

Follow Your Heart - a note of encouragement


I used the International Scrapbook Garden January Toolshed Kit:  Winter Adventure Bonus Fairy Garden papers to make this card.  Additionally I used the Tim Holtz Chipboard Sayings from the Toolshed: Winter Adventures Bonus Embellishments, and a heart from the Bonus Chipboard Kit.  I am in love with these hearts embellished with Stickles.  This card uses the colors "Blue Bayou" and "Mercury Glass".  I wish I could show you the sparkle in real life!

To make this card you need:

1 - 4 1/4 x 5 1/2  inch card
1 - background paper cut to 4 x 5 1/4 inches
1 - dark contrast patterned paper cut to 1 x 5 1/4 inches
1 - dark contrast circle of 2 inches
1 - light patterned paper cut to 2 1/4 x 3 1/2 inches
Chalk ink (I used Prima's Farmer's Jeans)
1 - Chipboard sentiment of your choice
1 - chipboard heart

Use the sample card to assemble the layers.  I used dry adhesive for all of the patterned papers and wet adhesive for the chipboard sentiment and the heart.

This card really lends itself to any time you need to send a note of encouragement.

Thanks for stopping by and I'll see you again next week.

~ Victoria

Friday, March 16, 2018

Enjoy the Journey


Happy Friday!  Almost time to celebrate St. Patrick's Day!  I'm here today using the Winter Tool Shed Kit bonus 6 x 6 papers,  from the International Scrapbook Garden, with an upbeat card entitled, enjoy the journey.

For this card I used only items from the kit, except the bright blue hearts from Queen and Company from my stash.  This card features six paper designs used in small amounts.  The background seemed best as a solid denim.  All these papers are from Maja Designs and come in the fairy garden card kit.  I just love all the blues, and notice how the floral prints blend without making the card look overly feminine!  Every layer was edged with the Prima Chalk Ink in Farmers Jeans.  I did distress the first layer with scissors, but other than that just straight edges chalked.  The sentiment is from the bonus embellishments:  Tim Holtz chipboard included in the kit.  There are so many great sayings I could just play on forever.

I hope you are all enjoying the journey today.  And I will see you next week with another card from the kit!

Enjoy!

~ Victoria
Thursday, March 8, 2018

Adventure Takes Courage


Happy Thursday and welcome to a little creative departure from my usual cards.  For this mixed media journal I used elements of the Winter Adventure Toolshed Kit, the world map paper and the Tim Holtz Chipboard words.  I also used the KaiserMist in Denim mixed with pearlescent white paint for the splatters and the Lindy's Starburst Spray in Canna Lily Burnt Orange mixed with pearlescent white part for the splatters.  The prompt I used for this page was from the Mission Inspiration Facebook Page:


The steps I took were as follows:

1.  Covered my page with tan tissue, using Mod Podge to adhere
2. Covered with white gesso with a baby wipe (I made my own with a paper towel, oil, water and soap)
3. Made marks using corrugated card board to pick up on the grid theme - I used orange and black paint mixed to approximate the terra-cotta and a blue that I had on hand with black to approximate the navy (I could have added additional black). 
4.  I added texture with vanilla texture paste from Marabu Mixed Media 
5.  The focal image is the world circle punched from Maja Designs paper and the photograph of my dad, when he was 21 years old, and came to the United States.
6.  I added the Tim Holtz chipboard phrases that were cut from those in the pack (oops!  I got the order slightly wrong).
7.  I created the splatters with shimmer using the mists, as noted above and a fan brush.
8.  I added a boarder with scribbles that look like a "W" in hindsight, for Warren (my dad's last name), with a Pitt Pen.  I also added some grid lines in black and some outlines as well to bring the design all together.

I hope to make a video in the future of how I use bits and bobs from the kit to create mixed media journal pages.

The date on the page is the date my dad came to the United States.  I colored that circle with a gelato in a terra-cotta color for a highlight.

Thanks for stopping by!

~ Victoria

Thursday, March 1, 2018

Waiting for Spring with International Scrapbook Garden!

Happy Thursday!  I'm back again to show you a tag that I made using components from the Tool Shed Kit:  Winter Adventure.


From the kit:

Maja Designs Denim & Friends - Fashion
Maja Designs papers from the card add on kit
Bark kiln dried Birch
Chip board
Blue Flower
Prima Resin Clock
Kaiser Mist Denim

Additions:

Adhesives
Ribbon from Webster's design
Twine Jilly Bean Soup
Shimmers Texturez Tidy Widy (from the October Kit)
Stars and Dew Drops Queen and Company
Mist in opaque white
Prima paper clay and face mold


I am pretty happy with the way the ice came out.  I sprayed the chipboard two times with the Kaiser Mists in Denim.  When that had dried thoroughly, I sprayed with an opaque white mist that reactivated the Kaiser mist and created the marbled look.  Finally, once that was dry, I painted dots and splashes of dark color to add emphasis and dimension.  


I have been trying out "new" techniques to add to my mixed media.  I used Mod Podge in Matte to adhere the wood strips to the tag.  I love the idea of using natural kiln dried wood on my projects.  I also really loved the difference between the exterior lighter color and the interior color, much more of a reddish brown.  I also made the face from Prima's paper clay.  I let it dry over night turning occasionally so it dried evenly.  I then used the Kaiser Mist in Denim for two coats, drying between each.  I love how the shimmer "drifted" down into the expression.  I adhered the face, once dry to the flower.  The title piece was completed on white card stock on my printer with one of my favorite fonts: Bookman Old Style.  Not sure why I like that one so much, but I find myself using it often.

Anyway, I am looking forward to longer days and the change of seasons.  Hope you enjoyed this tag and let me know if I can tell you anything else about the techniques I used.

Have a great week and see you again soon!

~ Victoria

Thursday, February 22, 2018

Have a Great Birthday!


Well, remember last post, I said I was loving snowflakes?  Well I still am only in a different way!  We have a few inches of snow on the ground with the promise of more to come.  This week I created a card using the Fairy Garden add on papers from the Toolshed Kit: Winter Adventure.  I am in love with the tennis shoes!  I used the denim star and the twine from the main kit.  Everything you see is from the kit except:  the card background, the nailhead stars and the stamp is one I have had for awhile.  I also did faux stitching with a pen.  


I wanted to show you the close up so you could see the tennis shoes, and the little tag has numbers.  So adorable!  Honestly, the kits from the International Scrapbook Garden are jam packed with fun!  You can't go wrong when you subscribe or shop with Tracie.  I am having so much fun with these hard-to-find (in the US) papers.  They really give your work a unique look!

Be back soon (hopefully with no snow on the ground)!

~ Victoria

Thursday, February 15, 2018

Sending Best Wishes


Oh my goodness, will winter ever end?  I am still loving snowflakes on the day after St. Valentine's Day.  I have this great "Sending Best Wishes" that I dearly love.  It came in a Downton Abbey set.  What better way to show  it off than to add it to a card with beautiful snowflakes.  I used two of the snowflakes from the Toolshed Kit bonus chipboard., from the International Scrapbook Garden.  I painted them with two coats of Golden white gesso, allowing them to dry between application, and once the gesso had dried I sprayed them with the Kaisercraft Kaiser Mists in Denim and let them dry.  The swirl below was created with a very old stencil that I have for swirls, from Hot Off the Press (here is Oregon)  using Shimmerz texturez in Tidy Widy, which was featured in the Toolshed Kit: the Spiders Web Mixed Media add on. I absolutely adore the Shimmerz line and the three media in the add on kit do not disappoint!


All of these beautiful papers are in the Toolshed Kit:  Winter Adventures Fairy Garden Bonus Paper.  This paper is so versatile and beautifully coordinated you cannot go wrong!  I have to admit I am saving the Earth paper for something special.  I'll be back next week with another card.  You have absolutely got to see the papers I will be working with next week!


In the meantime, happy crafting!

~ Victoria

Thursday, February 8, 2018

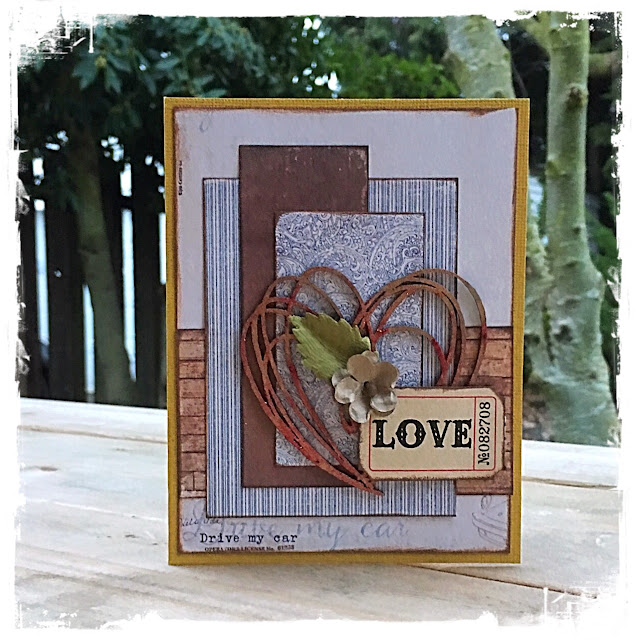
Valentine's Day LOVE Card


Wow!  What a whirlwind week!  Do you remember that next week is Valentine's Day?
Today, I made a Valentine's Card using the January Tool Shed Kit:  Winter Adventure Fairy Garden add on paper and the Tool Shed bonus chip board.


Supplies used:

Tool Shed 6 x 6 add on papers
Tool Shed Chip Board add on
49th Market Garden Seeds Linen
Prima Chalk Ink - Branch Bark (main kit)

Martha Stewart Acrylic paint metallic copper
Plaid Extreme Glitter Acrylic paint red
Tim Holtz Ideology Adage Tickets
Kraft (mustard) blank 5 1/2 inches by 4 1/4 inches
Dry adhesive, dimensional tape and tacky glue

Paper cuts:
1 3/4 inches by 3 inches (light color)
1 1/2 inches by 4 inches (dark color)
3 inches by 4 inches (light color)
4 inches by 2 inches (dark color)
4 inches by 5 1/4 inches (light color) - background

Embellishment:

Paint heart with copper metallic paint, I used one light coat
Let dry.
Paint  heart with red glitter paint, I used two light coats, drying well between coats.
Add the Tim Holtz Ideology Adage Ticket "love"
Add the 49th Market flower and leaf


Happy Valentines Day!

~ Victoria

Thursday, February 1, 2018

Genuine Limited Edition, that's my boy!

Happy first of February! Today I am featuring a min-album made with the Tool Shed Kit:  Winter Adventure. The little album measures 3 inches by 3 inches and is made from one piece of paper!

For this project I used the following supplies:

Maja Designs Demin & Friends - Jeans & Tie
Maja Designs Demin & Friends - Stonewashed
Lindy's Spray Flat Fabio - Tweedle Dee Denim
Kaiser Mists - Denim
Prima Chalk Ink - Farmer's Jeans
Blue Fern Studios - Techno Squares
Tim Holtz Ideology - Quote Chips
Bella Floral - blue flowers
Prima - Resin Icons
Wooden word - "love"
Light green sheer ribbon 12 inches
Dry adhesive and liquid adhesive
Two 3 inch by 3 inch squares of cardboard


For the cover, I covered the two pieces of cardboard with the stonewashed paper.  I cut the paper about 4 inches by 4 inches and trimmed the corners to avoid bulk.
I misted the techno square with the Lindy's Flat Fabio mist.  I also misted the cover lightly with the Kaisercraft Mist for the shimmer.  I adhered the dried square and the limited edition chip board piece with Aleene's Tacky Glue.  I added the love to the resin piece with tacky glue as well.  The resin piece, flower and word genuine were added to the cover with dimensional tape.

This album was made for my son to document last year's baseball season.  He played JV for his high school team.  I left out the photos of his dad and me freezing on the sidelines!  It is a cold sport here in the Pacific Northwest.


For all of the inner pages, I made a mat of 2 3/4 inch squares that I inked with the Prima Farmer's Jeans.  I also added a little 1/4 inch strip of contrast at the lower end of the mat.  Each page is also embellished on the left hand side with a heart punched from the stonewashed paper.


The team!  Love these guys from La Salle Catholic College Prep!


Here is a top view of the little album!  Do you need to know how to fold the 12 x 12 inch page to get this album?  If so, drop a note on the International Scrapbook Garden Facebook page and I would be happy to draw a sketch of how it is done.

I love that this little mini can tie closed and keep these memories for a time in the future!

I hope each of you has a blessed February and I will be back next week with more ideas!

~ Victoria

Thursday, January 25, 2018

Believe in Yourself...... Always!


Happy Thursday!  I'm here again with the fabulous new Tool Shed Kit: Winter Adventures!  This time in the Fairy Garden, I decided to take it off the page and make a fabulous box for one of the special guys in my life.

Everything I used, except the paper mache box, which is a 3 3/4 inch square box, is from the kit.

For the box I used:
  • Maja Designs paper  3 3/4 inch square
  • Creative Embellishments denim pocket (small)
  • Lindy's Sprays Flat Fabio - Tweedle de denim
  • Kaisermists - denim
  • Prima Art Ingredients Mica Flakes - Henna
  • Prima Chalk Ink - Farmers Jeans
  • Bella Floral self-adhesive blue flowers
  • Tim Holtz Ideology Quote Chips
  • Darice Rustic Snow Shovel
  • Wooden branch slices (yes they are real wood)
  • Bakers twine- brown

Let me show you a close up (ultra close up) of the chip board pocket, following misting.
I misted first with the Lindy's spray and let dry and then added the iridescent layer from the Kaisermist in denim.  You can also see I added the mica flakes.  You will need adhesive to attach these.  I prefer using liquid adhesive (Aleene's Tacky Glue)  If you make a nice pool of adhesive in your desired shape and shake the mica on, gently tapping off any excess, I find it works best.


I adhered the pocket with dimensional tape once it was completely dry.  For the wood slices, I used tacky glue again.  I attached to two on the right first and let them dry over night.  I added the third at an angle with tacky glue on the edge that is touching the other two and also the chip board pocket.

Isn't the flower amazing?  Look at the color in the center!  It reminds me of fresh blueberries.  Just gorgeous.


 For the shovel I wrapped the handle with bakers twin and tied a small bow.  I'm not too concerned with super tidiness on this project since it is meant to look a little rough and tough!  I used a drop of tacky glue under the handle and then a piece of dimensional adhesive under the shovel part.  I've got to say I'm in love with this little box.


 I hope you have a wonderful rest of the week!  The ISBG DT has some amazing projects coming up!  I am so honored to work with this wonderful team!

Please come over and enter our first Facebook challenge, we are looking for you!


~ Victoria

Thursday, January 18, 2018

International Scrapbook Garden Kit Reveal!


This month's Tool Shed Kit: Winter Adventures and Fairy Garden papers are perfect for cards for teens or young adults in your lives.  I can't even begin to tell you how much amazing stuff is included in the main Tool Shed Kit!


Once again, I am pressed for time for a card.  So I wanted to go for a simple card using three pieces of 6 inch x 6 inch paper.  I selected a denim piece, an ivory piece with denim colored stars and the piece with the masculine images.  Once again, I am working on a grey card background to really make the denim colors pop!


I cut three pieces from the papers.
The background at 5 1/4 inches by 4 inches.
The contrast at 5 1/4 inches by 1 3/4 inches
The piece that is placed horizontally, which is the back of the denim piece I previously cut - just a tiny amount of waste paper that is 4 inches long.
Finally the image I wanted from the final piece.

Next I distressed all of the edges with my scissors.  To be honest I need a new blade for my paper cutter.  Distressing is awesome to cover those ragged edges!

I inked the edges with the Prima Chalk ink, included in the main kit in "Farmers Jeans".
It really gives an excellent contrast.

I then adhered all of the background pieces together.  I do this in case I don't like how it looks.  I can always change it before committing to the card.  After this background was put together I used the KaiserCraft spray in denim.  For this card I wanted a bit of a grungy look so I didn't even test spray.  So what you see is what I got after "priming"!

I then adhered the image to the card using dimensional tape.  While the mist was drying, I took a denim star and adhered a wooden heart and xoxo from the kit to the heart using tacky glue.  I also tied a bow in the twine included and adhered it to the card.

Finally I put the love wooden piece in the upper corner.  Allowing the entire front to dry.
Once everything is dry and I make sure it is sturdy, I used dry adhesive to adhere the entire piece to the grey card.

This kit is simply amazing.  I can hardly wait until the weekend to play some more with all of the wonderful papers.

Have you checked out our mood board and contest on Facebook?  Be sure to check it our and check out the kit at the store....... AMAZING!

~ Victoria

Thursday, January 11, 2018

Valentine Card from Christmas Papers - Breaking Rules


Have you ever found your self needing a quick card for a holiday and you don't have that holiday's special papers?  If so join the club!  I want to show you a quick Valentine made from (gasp!) Christmas papers.

Today I was at my day job and had my two breaks and lunch to finish a card, including drying time.  So I packed up a small kit before I left for work and decided I would see what happened.


This is my "kit":
  1. One pre-folded grey card blank
  2. A Tim Holtz mini stencil in argyle
  3. Shimmerz Texturez in Tidy Widy * available in the store at the International Scrapbook Garden
  4. Maja Designs Home for the Holidays * available in the store
  5. Viva Glitter Pen Silver
  6. Scissors
  7. Adhesive and
  8. A heart punch.  
Everything fit in a 1 quart bag in my tote.

I needed to make my card in a couple of steps to have everything dried and ready to assemble on my afternoon break.  After cutting the two base pieces from Christmas papers and adhering them to each other, I used the stencil and the Tidy Widy Texturez.  I used an old credit card I carry with me to apply the medium over the stencil.  This paste is super white, which I love.  I put a thin layer on and some of the red shows through, so it ended up having a pinkish shimmer.


Often I am super careful to get a very even layer, but I wanted some rough interest on the card.  The photo above is wet.  

At the same time I punched the heart out.  I used the Viva glitter around the edges.  To keep my workspace clean for this and to have a place to dry, I used a trusty yellow post-it note.  That way I could move it out of my workspace to a drying area, while I was doing my day job!

Here is a close up of the heart and the stencil on the card.  See the pinkish shimmer?  Cool huh?


So I used some beautiful Christmas papers and some great mediums.  Who would know it's Christmas paper?  Thanks for stopping by!  I hope you all have a wonderful New Year.

Thanks for stopping by!

~ Victoria