Monday, December 25, 2017

Merry Christmas to all of my blog readers.  Today I am featuring some papers by Maja Design found at the International Scrapbook Garden on line store.  I am in love with these papers and these cards went to the two most special guys at my house, my husband and my son.

These two cards are designed using Maja Designs - Home for the Holidays 6 inch x 6 inch paper.  
The paper pack has so many great designs and these are just two of the cards I made using these papers.


The Santa Claus Special Delivery Card

Uses the following supplies:
  • A plaid strip cut to 1/2 inch by 5 1/4 inches
  • The Santa Print paper cut to 3 1/2 inches by 5 1/4 inches
  • The Single Santa cut to 2 inches by 3 1/2 inches
  • The Red Snowflake patterned paper cut to 2 1/4 inches by 3 3/4 inches
Red Card Stock
  • 2 1/2 inches by 4 inches
  • The card blank 4 1/4 inches by 5 1/2 inches
Tim Holtz Ideology Christmas Ephemera
  • Special Delivery
All edges distressed with scissors.
Adhesives - flat and dimensional tape

Distress all edges with scissors.
First assemble the Santa focal, using the single Santa, the snowflake paper and the red card stock.
Adhere the plaid strip to near the edge of the card.
Adhere the Santa patterned paper to the card base.
Mount the Santa focal element using dimensional tape.
Finally, at the special delivery sentiment.


Gentleman's Season's Greetings

This card is virtually the same design as the card above. Using the deer themed papers.

The difference here is the focal strip is cut to the 5 1/4 inch length.   Again I have distressed all edges with my scissors.  The gentleman is from the Tim Holtz paper dolls pack, while the wreath is from the Tim Holtz Ideology Christmas Ephemera.  I used some Diamond Stickles by the edges to give the card a little shimmer.  I also used some Ruby Slipper color Stickles on the wreath to give the berries some glitter.

Hope you enjoy these cards and have a very blessed holiday season!

Monday, December 18, 2017

International Scrapbook Garden - Things are not What They Seem


Hello!  It's Victoria, again.  Back with another fanciful card created from the International Scrapbook Garden Tool Shed Kit:  Spider's Web.  I absolutely love the wood grain paper.  It really makes anything you add to it "pop".  In this case I used a simple design of rectangular layers.  I used a 4 1/4 by 5 1/2 inch card blank, created from black card stock.   The wood grain paper was cut to 4 by 5 1/4 inches.  The cross shape uses black card stock with plaid layers and black card stock with word layers.  The embellishment of the framed crow is from Martha Stewart and "morphs" into the crow skeleton.  The washi tapes are from Tim Holtz, as is the saying.  I love how six layer can add so much depth to a simple design.

Hope you enjoy this card.  Check out all the ideas on the blog.  You will be inspired by all of the great projects from the design team.

~ Victoria

Tuesday, December 12, 2017

A Strange Visitor - International Scrapbook Garden


I have been patiently waiting to showcase the Martha Stewart elements.  See the cat?  Later you won't!  For this card, I used a blue card base, that has a kraft interior.  The fabulous papers are from the ISBG Tool Shed Spider's Web Kit.  I have been having so much fun distressing these papers with my small scissors.  This card uses only kit items and a small corner punch, an edge punch of your choice and silver pearls from my stash.  I am absolutely in love with the laces that came in the kit, in both black and white.  And the charms are also super cute.  In fact I considered holding back a pair and making some spooky Halloween earrings (I may still).

I did my best to photograph the super cool Martha Stewart images.  The image above shows the black cat (just one of several images in the kit).  Now take a peek at this photo:


Isn't that the coolest thing!  Spooky, right?!?

Happy to show you this card and the fantastic element from the kit.  Be sure to check out the rest of the blog and the store for more great ideas!

~ Victoria

Monday, December 4, 2017

International Scrapbook Garden Toolshed Kit - Jack Skellington Christmas Tag


Hello!  It's  Victoria back again!  I do hope that you are enjoying the first week of Advent.  I am here today to show you a Nightmare Before Christmas inspired tag I made with the International Scrapbook Garden's Tool Shed Kit:  Spider's Web.  I was inspired after watching this movie again this year.  I mean really who doesn't love Jack?  I punched a circle and did a hand drawn face of Jack, aside from the twine and the silver pearls you can easily make this with all of the items included in this great kit.  I personally think this would make a fantastic gift tag for the right person, you know who I mean!

Starting from the bottom, the details:  
  • I made a hanging charm using the skull and cross bones charm and an acrylic letter J from the Tim Holtz Ideology Transparent tiles.  I used a large jump ring and punched a small hole for attachment.  The saying sticker (Tim Holts Ideology Clippings Stickers - Halloween).  I used tacky glue to adhere it down over the image I stenciled using Paste-eez from Shimmerz Paints in Lava Flow.  I am really loving my argyle stencil this winter.


.

Moving up the tag you can see the awesome black Texture Elements flower from Petaloo that I added to the tag, again using tacky glue to make sure it really sticks.  I also gave Jack a hand tide baker's twine bow in black and white from my stash.  Jack was drawn on a punched circle of white card stock using Pitt pens.  To be fair, I did use pencil first so that I could get the expression I was going for!


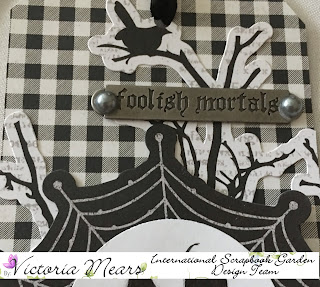
Moving to the top of the tag, you can see the fabulous black and white checked paper from Authentique.  I used a border from Pion Papers the Witching Hour borders sheet, which I cut to the size of the tag.  I love the name plate, which is one of Tim Holtz Word Bars from the Halloween line. I "attached" it to the page using two silver pearls from Queen & Co.  again using tacky glue to adhere. (no I don't work for Aleene's, but I sure do use a lot of tacky glue).


I hope you enjoy another unconventional Christmas tag using papers you might not think of as Christmasy!  Why not check out the kit and get ready to scrap those Halloween photos or use the papers creatively!


Have a wonderful week!  I will be back again next week with more ideas from the Toolshed Kit.

~ Victoria

Wednesday, November 29, 2017

Thankful

Hope you are all entering into the holiday season feeling thankful and blessed.  I am blessed to know the entire design team for the International Scrapbook Garden.  Over the past few months we have all gotten to know each other better!  For this layout, of me, I wanted to think of and acknowledge all of the things I am thankful for as we move into this holiday season!

I used the amazing Spider's Web Kit, which is the Tool Shed Kit of the Month.  The products in the kit and the bonus add ons are simply amazing!

For this layout I used:
Pattern papers: Authentique Bewitched papers number 1 and 5
and Pion Papers The Witching Hour Borders
Shimmerz Texturez: Tidy Widy
Shimmerz Dasslerz: Dreamscicle
Lindy's Spray:  Cala Lily and Burnt Orange
Petaloo Flowers:  Textured Elements Black

I also needed liquid adhesive, regular ATG glue, a hexagon punch and one polka dot dot in black and white from my stash (Queen and Co.)


This was a super fun layout to do with some stencils I had on hand, one with diamonds and one with circles.  I let my dimensional pastes air dry, so you have to be a bit patient!


Aren't those textured flowers luscious?  I put them onto the layout with liquid adhesive.  I also assed liquid adhesive to the back of the clock sticker so it would adhere over the textured medium - more patience.  I really like the wood grain of the base paper and the splatters in the lower right corner are so much fun.  The color is almost as rich as a red!

Thank you for stopping by and checking out this layout.  I am thankful for all of you and the International Scrapbook Garden! 

~ Victoria

Thursday, November 23, 2017

Happy Thanksgiving with the International Scrapbook Garden

Here is hoping all of our fans at ISBG have a wonderful Thanksgiving, if you are in the US!
The turkey is in the oven, as is the stuffing and the pies are made.  I want to share three cards and a canvas I made with the new Tool Shed Kit:  Spider's Web 

This kit is amazing!  I made three cards.  This first card is made with the Fairy Garden add on!  I absolutely adore this image.  I used the argyl paper, the witchy image, a tag and some brown bakers twine.  I absolutely adore the Lindy's mist that was included in the kit.  

Card number two is a further back vintage-y feeling card.  I used these supplies:
4 1/4 x 5 1/2 inch white card base
Black mini doiley
Kaiser Craft 13th hour sticker sheet
Pion Designs The Witching Hour - Dark Roses Patterned Paper cut to 4 1/8 x 5 3/8 inches
Petaloo Orange flowers
Sticker Tim Holtz Ideology Halloween Clipping Stickers
Three yellow sequins.


This last little 4 1/4 inch x 4 1/4 inch card is called I'm Thankful for You.  I used a white card blank, patterned paper from Pion Designs October Garden from the Witching Hour collection and letters from the KaiserCraft 13th Hour Sticker Sheet.  This card is perfect for any fall celebration!


Finally I made this 8 inch square canvas with items from the kit.  I am in love.  My favorite TV show was GRIMM.  One reason was some of it was filmed at the University I was teaching at while the show was on air.  And of course it is filmed in my home town of Portland, Oregon.  This canvas made with all kit items is a nod to the show and the "skull guy".  The sayings were combined to give a GRIMM like attitude and the prescription note reminded me of Rosalee's Spice Shop.  The only thing I added to make this was Mod Podge in Matte and the Lindy's Spray that is purple in Witches Brew, everything and I mean everything else is in this fantabulous kit!


 Have a blessed Thanksgiving with your families and friends!

~ Victoria

Sunday, November 12, 2017

Christmas in the Fairy Garden International Scrapbook Garden Kit

Summer is gone, but fortunately the Summer Fairy Garden Kit is still available at the International Scrapbook Garden.  And it's on sale right now.  I still love the pinks, greens and pale blues of this kit!  So I decided to make some festive Christmas tags.  You can never start too soon, right?!?


The two left tags are my two Christmas tags, and don't you love the summery watermelon?  See how the colors can be seasonless? The papers, tiny roses, ribbon and stamp are all from the kit.  Along with that luscious watermelon and the paint for the chipboard.

First let me show you the angel tag:


And a little close up:


Next up is St. Nicholas, Father Christmas or Santa Claus.  Did you know that December 6th is St. Nicholas Day?  In many countries it is traditional to leave your shoes out and St. Nicholas fills them with candy or other treats!


I thought Santa could use a little shabby, retro, steam punk look!  All on that luscious green paper and with the lovely white ribbon bow.  What an amazing kit!

So if you were undecided on the Summer Fairy Garden:  Picnic in the Garden kit.  Go for it!  If you have a little time and a few holiday embellishments you can create lots of beautiful cards and tags with a green and pink theme that will add a feminine touch to your holiday giving!

~ Victoria


Friday, November 3, 2017

International Scrapbook Garden Stairstep Card

Hello,
ISBG Fans!  I am still busily making cards with the Fairy Garden kit.  You can never have too many thank you cards around and the latest kit stretches so far.  I made this stair step card using the Summer in the garden kit.  All of the components and embellishments, except the black ink, and the prima iron swirl are included in the kit.  What a joy to have a card on hand that I can send to anyone to say thanks.

If you haven't already gotten on board with the kit club, I hope you will take a look.  The quality of the papers and embellishments is amazing!

Here's a little close up:


I think the colors are amazing! So on trend and beautiful.

Have a blessed day and I will be back with some tags to share next time.

~ Victoria

Friday, October 6, 2017

Friends are a True Gift Card

Friends really are a True Gift.  I am having a wonderful time using the Fairy Garden Kit: Picnic In the Garden.  This is my second card using the wonderful items from the kit.  I still have so much left to use, since the kit is so generous with patterned papers and other goodies.  This card uses four different papers, stamps, flowers and ribbon.  The only items I added were my own  corner rounder, black ink, a white card blank and using scissors for edge distressing.  This is such a simple five layer card.

I love the look of three rounded corners and one left pointed, however this card could easily be made with all rounded corners or none to your wishes.  The papers are cut to the following dimensions:
  • Background: 4 x 5 1/4 inches
  • Square (behind): 3 x 3 inches
  • Square (front) 2 1/2 x 2 1/2 inches
  • Banner:  1 1/2 x 4 1/2 inches
This card could be made with any of the kits.  I think it would lend itself easily to the more masculine Tool Shed Kit: Summer Concert, with some of the chip board embellishments in place of flowers, or you could make a bright sunny version with the Garden Kit:  Sunkissed .

I am so excited to see what you create with this kit!  It is so wonderful.  I will see you later in the month for another mixed media project using this great kit from International Scrapbook Garden!

~ Victoria

Saturday, September 30, 2017

International Scrapbook Garden Fairy Garden Friend Card


Hello friends!  Here is my first submission for the International Scrapbook Garden design team.  I have the honor of using the Fairy Garden Kit Picnic in the Garden this month, which features loads of wonderful papers, flowers and wonderful sentiment stamps, among other goodies.  This kit is so generous in size.  Making this card barely touched all of the wonderful items in the kit!


I had so much fun making the open front card.  It definitely is an intermediate level technique but was super fun.  Full instructions on how to make this card are on the International Scrapbook Garden Blog! 

I am anxious to see what you all do with the kit, so check out the blog and follow the ISBG on Facebook.  You never know what fantastic finds you will find in the garden!

~ Victoria

Monday, September 4, 2017

Winner of the International Scrapbook Garden Blog Candy!!!!


Check out this card that I made with some of my generous winnings from the International Scrapbook Garden!  The papers are amazing! The designer at 13@rts hit the nail on the head.  The pack I received is 6 x 6 inch papers, perfect for card making.  The sentiment and the background paper come from the pack.  I used a punch to create the doily from white card stock.  The frame was painted with Art Alchemy Acrylic Paint Sparks in Mermaid Sparkle, when it was dry I used a purple spray to add dimension.  The flower is from my stash of Prima and the ribbon is Offray brand.
I absolutely adore how this card came out and extend my thanks to Tracie at ISGB for a generous gift!  Stop by and follow the International Scrapbook Garden Blog

Have a wonderful day!